
Shake Shake Shake...
It's been a while since I've posted something....or at least it feels that way. A friend and I decided to hike Guadalupe Peak (the tallest point in TX) several weeks ago, so now I'm trying to get back into my routine. Here are photos from our trip.
If you're tired of your camera movement animations looking to cg-ish, this tip could help you. If you want to go for that hand-held camera feel, there is a very easy way to apply this effect to your already animated cameras. I've found using this trick in some of my camera shots brings an extra dimension of reality to my animations. It's a very subtle effect, but can make the difference. This is achieved using the Noise Float Controller.
Straight camera animation:
Hand-held camera animation:
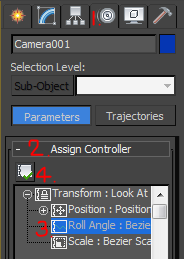
When you create your camera in 3dsmax it comes with default controllers assigned to it. To see those controllers go to the Motion Tab (1.) in your control panel, and open the Assign Controller (2.) rollout. The controller that we are going to select is in the Roll Angle (3.). The default controller for the Roll Angle is set to "Bezier Float". You will want to change the controller from Bezier Float to Noise Float. To do that select the Assign Controller button (4.).

You will see a list of different controller types. The one we're interested in for this effect is the Noise Float controller. When you select it and hit "OK", a new dialog will pop up. These are the settings for the Noise Controller. You will find that playing with these settings will adjust the way your camera rolls as it moves during animations...this is what gives it the hand-held shake effect.
 After playing with the Noise settings, here are the settings used for this examples animation. Every animation will be different based on speed, camera movement, timing; so you will just have to play with the settings through trial and error until you get your desired result. If you'd like to open the Noise Controller window again after you've already closed it, simply double click the Roll Angle.
If you want to remove the Noise Controller, select the Roll Angle and hit the Assign Controller button (4.), then just go back to the Bezier Float controller.
Happy Shaking!
If you're tired of your camera movement animations looking to cg-ish, this tip could help you. If you want to go for that hand-held camera feel, there is a very easy way to apply this effect to your already animated cameras. I've found using this trick in some of my camera shots brings an extra dimension of reality to my animations. It's a very subtle effect, but can make the difference. This is achieved using the Noise Float Controller.
Straight camera animation:
Hand-held camera animation:
When you create your camera in 3dsmax it comes with default controllers assigned to it. To see those controllers go to the Motion Tab (1.) in your control panel, and open the Assign Controller (2.) rollout. The controller that we are going to select is in the Roll Angle (3.). The default controller for the Roll Angle is set to "Bezier Float". You will want to change the controller from Bezier Float to Noise Float. To do that select the Assign Controller button (4.).
You will see a list of different controller types. The one we're interested in for this effect is the Noise Float controller. When you select it and hit "OK", a new dialog will pop up. These are the settings for the Noise Controller. You will find that playing with these settings will adjust the way your camera rolls as it moves during animations...this is what gives it the hand-held shake effect.
If you want to remove the Noise Controller, select the Roll Angle and hit the Assign Controller button (4.), then just go back to the Bezier Float controller.
Happy Shaking!
John,
ReplyDeleteto keep a steady animation, before you start keying, set your "Default In/Out Tangents for New Keys" (the button next to left of the Set Key button)from bezier to linear (the straight line).
That will fix those pesky smooth in/outs. Just a caution that your key frames won't interpolate smoothly though...maybe I should do a post on the Curve Editor :)
Nice job. Thanks for the tip.
ReplyDeleteI used long ago an strange trick for a walk-trough animation: I linked a free camera to the head of a biped !!!... It worked quite well, anyway I like your method too, it doesn't have so many steps and you could also turn any camera into a "hand-shake" one at any time !!
ReplyDeleteThanks!!
what if I want to do no camera shake? what are the settings? I am getting camera shake without changing it to Noise Float... all my animations shake! I dont want that. I dont know why it is doing that.
ReplyDeleteBill, if you're getting a camera shake right off the bat, it's likely that your camera target is too close to the camera.
DeleteYou can either change the camera from target to free, or just move the camera target far away from the camera.