It's been a while since my last post. Between 3D projects, holidays, and life getting in the way, this has been sitting in the corner waiting. No worries, I'm not going anywhere. So let's get to it.
Animations with motion blur (MB) look so much better than without them. Sometimes just adding the MB can be the difference in making an animation go from good to great. But rendering with MB turned on can become very expensive and slow on your renders. So here is yet one more pass to add to your arsenal of compositing passes: the Velocity Pass. The velocity pass will allow you to fake MB in compositing. I'm sure the velocity pass can be used in photoshop, but it is really geared for using in packages such as After Effects and Composite (which comes with 3dsmax for free now).
 |
| Without Blur |
 |
| With Blur using velocity map (exaggerated for effect) |
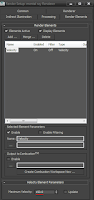
So here is how to create the Velocity map: Just go to your render settings window, select the Render Elements tab, and click "Add." Choose the element "Velocity". That's pretty much it. Under the Velocity Element Parameters be sure to tweak your Maximum Velocity, otherwise you may never see any results. Often I will check "Update", render, then un-check "Update". Having update turned on will change the Maximum Velocity based on your scene at render time. So if you have an object moving crazy fast, it will know what to set that value to. For this posts example, I found that a setting of 150 worked well for my spinning torus-knot. Also be sure that Filtering is not checked. Much like the Z-pass, the stepping on the pixels must not be aliased or you will get strange results. So now when you render your image sequence, a velocity map sequence will render as well.
 |
| velocity pass |
So you know how to make a velocity pass.now how to use it. for this example, I will show you how to do this in After Effects, but it can be achieved with other compositing programs. Drop your beauty pass (regular render) sequence and your velocity pass sequence into the timeline. Be sure your beauty pass is the top layer so that you can see it in the preview window. I like to use the CC Vector Blur effect.so with your main layer selected right click and choose Effect->Blur & Sharpen-> CC Vector Blur. In the Effects Window you can now see all the settings for the CC Vector Blur effect. Under "Vector Map" choose your vector layer. You can now see the blurring effect on your render. You can adjust the Type, Amount, Angle, Smoothness, and Softness to control the look of your motion blur.
With lengthy animations with a lot of motion, this method will by far be faster than blurring straight into your render. I'm always a proponent of post work, because you can adjust your settings and see the results in real time without having to re-render.

 So you know how to make a velocity pass.now how to use it. for this example, I will show you how to do this in After Effects, but it can be achieved with other compositing programs. Drop your beauty pass (regular render) sequence and your velocity pass sequence into the timeline. Be sure your beauty pass is the top layer so that you can see it in the preview window. I like to use the CC Vector Blur effect.so with your main layer selected right click and choose Effect->Blur & Sharpen-> CC Vector Blur. In the Effects Window you can now see all the settings for the CC Vector Blur effect. Under "Vector Map" choose your vector layer. You can now see the blurring effect on your render. You can adjust the Type, Amount, Angle, Smoothness, and Softness to control the look of your motion blur.

thanks for this post. i was trying to figure out how to do it in AE for a very long time. Now I have to try this in Maya for our school's team animation.
ReplyDeleteHi! Let me congratulate you for this outstanding, incredible useful blog, i've learned so much from your didactic posts. You are very clear and precise in your explanations.
ReplyDeleteI would very much like to see, just as a rec., something about your lighting: how do you make it realistic, when do you use Sky Ports, how do you make Photomethric lights visible when i'm having so many problems balancing them with the exposure, how do you think your models so that lights fills the buildings, etc..
Thank you very much and congratulations again!
thank you.
ReplyDeleteY'know I've been meaning to look into making synthetic motion blur for a while now, but just never got around to looking into it.
ReplyDeleteThanks a lot, this has saved me valuable time. At lest I don't have to sift through Google searches for this technique now.
Thank you very much for your unselfish work, for a long time I gave up with the speed channel that had no form of postproduccirlo, I have a question, in what format you save the render element? "TGA would output the correct format?. Greetings from Sevilla (spain) here are many people who follow you and thanks you for your work and excuse my English is very bad spoken and written will be worse, a greeting ...
ReplyDeleteThank you for sharing his knowledge, for this post is very interesting to note that the actual blur effect my question whether this can be done only with 3DS Max without the help of After Effects? Greetings from me (helick) from Indonesia.
ReplyDeleteYes, in the renderer tab, go to Camera Shaders and in the output choose HDR Image Motion Blur. This will add the effect after your render finishes in 3dsmax.
ReplyDeleteThank you, Ramy, for this cool technique!
ReplyDeleteI was wondering how to do good-looking motion blur using After Effects and a Velocity pass for quite some time now. This is a real time-saver.
Thank you!
Thanks,nice technique. www.new3dstuts.tk
ReplyDeleteThe 3D Max Velocity Element doesn't seem to calculate still objects that should be blurred by virtue of a camera moving past them. Unless I’m missing something. Is this correct? Thanks for all your help!
ReplyDeleteThat's correct. It will not add blur based on just the camera moving.
ReplyDeletesorry, but this is not working.
ReplyDeletei played with the settings, and there is no way, i can get the grey background not blured while the colors indicating the velocity in the right direction.
Thanks a lot !!!!! it's really usefull !!
ReplyDeleteThank you for making those gifs! specially the velocity pass itself!
ReplyDelete