Attaching & Detaching Meshes
 I just wanted to point out some very useful buttons. These may be two of the most useful tools in the mesh modifier rollouts. The attach button is used for attaching several meshes into one mesh. The detach button is used for detaching a selected portion of a mesh into a new mesh. I’ve found these useful for managing large scenes so I don’t have to group objects. You will notice that you see Attach and Attach List, but if you click Polygon or Element, Attach List will switch to Detach.
In this first example you will see that there is just one object in the scene. I chose select by Element, which will select all connected faces. So when I select a face on the tire, the whole tire is selected.

When you click on Detach it will give you several options. If Detach to Element is checked then the faces will stay in the same mesh. If Detach to Element is unchecked then you can name the mesh that it will convert it to.

When you click ok, now you will see two meshes in your scene. The original mesh (AudiTT) and the new mesh (tire01). The new meshes that are created from an existing mesh will always share the same material.
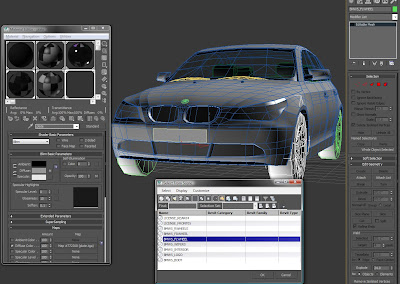
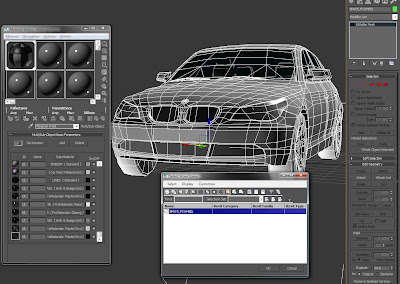
 In this next example you can see that there are 9 different meshes for this model. To attach them together you must have one of them selected. I chose the mesh BMW5_FLWHEEL. Now you can either click on Attach or Attach List. When Attach is selected, anytime you click on another mesh it will attach it to your current mesh.
When you click on Attach List, it will pull up the scene selector, and allow you to select other meshes by list. This is useful if you have too many objects to select in the 3D viewport.
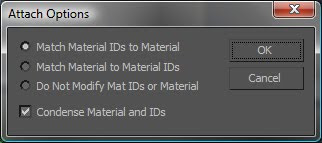
 If the new mesh you are attaching to the old mesh has a different material, this dialogue pops up. It is giving you several options for what to do with merging meshes with different materials. I usually just leave it as is, and hit ok. These settings will create a new Multi/Sub Object Material (MSOM) with instances of the existing materials. When the meshes are attached their faces will have corresponding IDs to their material ID.

This comment has been removed by a blog administrator.
ReplyDeletethanks for the lesson, but I also do modeling and renderings, but in the main visualization lighting of building facades. I liked your work.
ReplyDeleteеще мы открыли 3d портал для дизайнеров с материалами для моделирования и дизайна, если вам будет интересно, то заходите пожалуйста по адресу http://xtas.ru
sorry, have written to you in Russian, I am writing now in English:
ReplyDeleteWe also opened a portal for 3d designers with materials to model and design, if you will be interested, then please go to the address http://xtas.ru
tip: in the Soulburn script pack by Niel Blevins there is a script called attach selected, strangly a function that doesnt exist in max, it realy speeds things up.
ReplyDelete