Multi/Sub-Object instancing trick
This really isn't a trick. It's just understanding how materials in max work, but it can sometimes still feel like a trick. This "trick" may resolve some of your Multi/Sub-Object (MSOM) woes. There is often the scenario that you import a .3ds file into max, and it contains several meshes each with a MSOM but with instanced sub-Standard materials. The next thing you want to do is to change them from Standard to A&D or V-ray materials, once without having to do any copy then paste (instance).

Having too many MSOM's in the Material Editor, especially with sub instanced materials can make max sluggish and perform slowly. I will show you an efficient way to do this that doesn't slow max down, and makes it a quick and easy job.
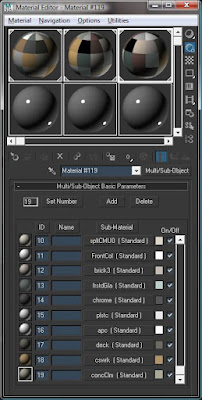
On the right is a similar scenario where I imported a .3ds file, to find that it created 3 meshes each with 3 MSOM's. I wanted to change all of the materials from Standard to A&D without going through the list of the MSOM's and seeing which one had (Standard) and which one had (Arch & Design(mi)) next to them.
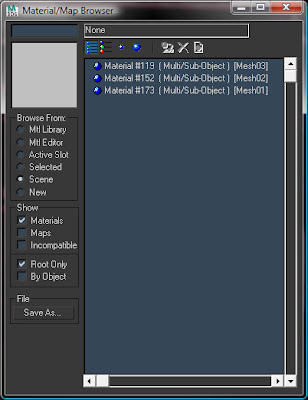
Firstly in the material editor, click on the Get Material button on the left or go to Rendering->Material/Map Browser.

On the left in the Browse From section, if you click on Scene, it will potentially show you all of the materials and maps you have in your scene. So just because your material editor is empty, doesn't mean you don't have materials in your scene.
You will also notice that on the right side of the material, it will have a list of geometry that the material is actually applied to. If the material is a MSOM, I find it helpful to name material after the mesh its applied to...just to keep things straight in my head.
Now if you have Root Only checked, you will only see the MSOM and not the other materials inside the MSOM. If you un-check Root Only, then you will see all of the other materials show up. This is very handy, because you can go one more step and tweak the individual material.

So for example, the image on the left: I clicked on an empty slot (bottom-left) in the material editor, then went to the Material/Map Browser and I double clicked on FrontCol (Standard). This places it in the empty slot in the Material Editor. Because I have FrontCol in all 3 MSOM, and it's instanced it doesn't matter which MSOM I grabbed it from.
Now because it's standing by itself I can do whatever I want to it, and it will change it in all 3 MSOM's! So I clicked on Standard and changed it to A&D, and you'll notice that it changed the FrontCol in all 3 MSOM's to (Arch & Design (mi)) in the Material/Map Browser.
Voila, the easy way to change materials in MSOM's!

The material browser is underrrated :-) In cad courses they always remind you of the importance of layers, selection groups, groups, MSOM, proper naming schemes, etc... but i remember just ONE class when we actually used the material browser.
ReplyDeleteAnd it was just to point at an example, not to actually do anything with it.
the other thing that might help with converting these at least to arch and design is the script that zap posted on his site a long time ago, converts standard mats to their arch and design equivalent. i think it still works in max 2009, don't have 2010 installed yet so not sure about that.
ReplyDeletehttp://mentalraytips.blogspot.com/2007/02/max-9-converting-other-materials-to.html
A BIG THANK YOU!
ReplyDeleteJust working through this area on my course, it's good to see that it is worth the button switching and screen hopping to get what you want. Thanks
ReplyDeleteRamy,,, i have A problem in opening the material editor,,, all Empty slot became color White, not dark gray as Before... how Will i solve that>?
ReplyDelete