Parti Volume Shader
Volumetric lighting can be a mysterious thing in mental ray. I'm going to go through the Parti Volume Shader, and hopefully you will be able to know how to use it after understanding it.

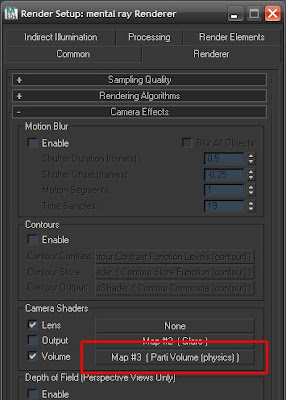
 Firstly, how do you apply it? Go to your render settings, and click on the Renderer tab. Scroll down until you see the Camera Shaders section. Click on the button that says None to the right of the Volume option. Here you will see a list of various volume shaders, choose Parti Volume. Now you have it applied, but like alot of shaders in max, to access click on the Parti Volume button and drag an instance of it to the material editor.
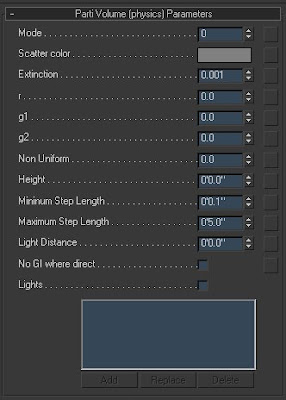
 The default settings:
Right away if you were to render your scene, assuming it has lights, you will a very slow rendering that looks blown out with too much volume. After I discuss each setting, hopefully you can tweak it to optimize your rendering and speeds.
Mode:
there are really two settings for this. 0 and 1. Anything else will give you strange results. Mode 0 is usually what you want. when Mode is set to 1 creates ground fog, and activates the Height function.
Scatter:
This color swatch is what gives the power behind your volume light. The lighter it is, the more volume effect you will get. The darker it is the less effect you will get. By default the value is set to 50% white, which is way too strong. I would suggest to keep gray-scale values for the best effect. Of course you can color the volume, but this is unnatural. Usually the closer you can get to black the better.
Extinction:
This controls how quickly light is absorbed by the particulate. The higher the value, the more volume you get. But it will choke your light. I try to keep this value as low as possible.
r, g2, and g2:
These values tend to act strange if you don't know what they're doing. Basically the three of them control scattering of the volume. The values g1 and g2 control the distance of the scattering between each other. The r value controls the favoring between g1 and g2. r=0 will favor g2 and r=1 will favor g1. Rule of thumb: r value should only be between 0 and 1, and g1 and g2 should only be between -1 and 1. You will get strange artifacts with other values. Keeping these at the default aren't a bad idea. But if you want to control the spreading, you can change these values.
Non Uniform:
this creates a non-uniform volume, and adds noise to the effect. I usually leave this at 0.
Height:
Only works when Mode=1. It controls the height of the volume from the ground for fog effects.
Minimum, Maximum Step Length:
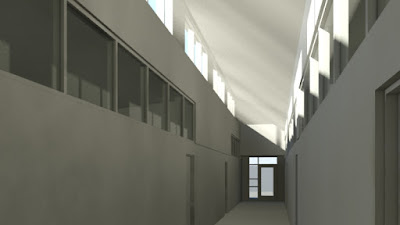
Simply put these control the sampling for the volume light. The larger the values the less samples are taken, and the faster the render. For quick and dirty test renders you can set these to min=4' and max=4'. Work your way down, trying to keep the min value smaller than the max value so that the solution is adaptive. Eventually something like min=1" and max=2' should give you more than enough sampling. For the render above I used min=2' and max=3'.
Light Distance:
This is a control for a falloff of sampling quality. It defines high sampling to take place within the specified distance.
No GI where direct:
If checked, when GI is calculated it ignores the volumetric light. Produces much faster GI solution of course.
Lights:
This is a very important option and should not be ignored if you have more than 1 light in your scene. It is off by default, meaning every light in the scene will emmit volume, which can cause very very slow render times; especially if you have like 40+ lights in your scene. When checked, it will only cast volume from the lights added to its list.
That's it for the Parti Volume Shader!
Other notes of weirdness for this shader...it only works with geometry behind the rays. So if your light which should be casting volume is against empty space, you will not see the volume. Solutions to this:
-put glass in your windows for interior scenes
-add an invisible sphere around your scene for volume passing over open air
This is achieved by creating a sphere that encompasses your entire scene, cameras and lights. Then apply an A&D material with Transparency=1.0 and an IOR=1.0 to the sphere. Then go to object properties, and uncheck Visible to Reflections/Refraction, Receive Shadows, and Cast Shadows. Also under the mentar ray tab, turn off Receive Illumination from Final Gather and check Exclude from Caustics and Exclude from GI.)


This is wonderful! I'll be including a link to it from www.3dCodex.com!
ReplyDeleteThanks for the tut, informative as usual :)
ReplyDeletefor reference:
common light scattering values are included in the mental ray docs
R G1 G2
Rayleigh 0.50 -0.46 0.46
Hazy Mie 0.12 -0.50 0.70
Murky Mie 0.19 -0.65 0.91
Thank you for these tutorials and tips. favourite and easiest to understand 3ds max blog out there.
ReplyDeleteThanks for this Information
ReplyDeletecan u help me to reduce Brightnes in Mental Ray
cause when we render in Default we get Exact material we applied but In mental ray after on final gather we get bright Image i used mr photographic Exosure control but dont get enough result.
Hi this is a very good tutorial.I also have some good video tutorial on 3ds max particle effect and mental ray
ReplyDeleteHi,
ReplyDeleteIve been trying to use this technique using a mr DaylightSystem, but i had no results. Is it possible? Thanks!!
Yes it is. The first rendering above is using a mr Daylight System
ReplyDeleteA stupid question maybe... by when I add lights, they do not show in render... what am I missing? Thanks...
ReplyDeleteSorry... to be more specific, when I render a scene, the default lights light the final rendering. But if I add a light, I can see it in my perspective and other views... but the rendering will just show my object as unlit and dark. I have the light "turned on" in the material editor. If I delete the light, my rendering will be lit, again, with the default lights.
ReplyDeleteI know this must be some very basic, simple, toggle I'm missing... but since it's so basic, no one addresses it, that I can find, on the web... so I am left hoping you see this, and can help me. Thanks...
increase your light intensity value / or try playing with your exposure control in the environment settings.
ReplyDeleteThanks, Ramy... OIC... I may simply not have enough light! I'll give those a shot. Rich.
ReplyDeletegreat information thanks for sharing.
ReplyDeletebut i gott a issue using it with daylight system in mentalray.
it seems like the whole render and the wall closest to the daylight gett realy blownup and white/bright.
Any idea why or how?
hey ramy,
ReplyDeletejust like to ask, did you composite the volume light with your final render?
or did you render them together?(parti volume and the archi scene that is)
-kevin
No. For this rendering, the volume light was rendered in a single pass with the building.
ReplyDeleteok, then how did you make the room lit up with just the daylight system? i tried doing it to a simple room but when i used the parti volume shader and selected only a photometric light to use it, the whole scene is very dark. when i crank down the exposure, it doesn't give quite a nice render output even when it lights up the scene. can i send you my file so you can check? thanks
ReplyDelete-kevin
hi ramy,
ReplyDeletei hope it's ok with you, i might be the dumbest of dumb who cannot produce the same output that you do with your above sample. is it ok if i ask a file copy of the above render you made with the volume lighting using the daylight system? if it's fine with you please email it to raymund.samson@gmail.com
thanks so much and more power.
kevin
Hello Ramy,
ReplyDeleteVery impressed by all your tutorials (on rare subjects on mental ray). However, I have tried parti shader on 3dsmax2008, and I encountered some issues. Parti shader does not work with photometric lights and daylight: volume light is created but not volumetric shadows. Only standard lights correctly work to see both volumetric lights and shadows.
May I know your settings for your scene ?
Do you use mr Photographic exposure Control ?
What is the Multiplier for the Sun and Sky ?
Do you use mr Sky and mrSun ?
Is your camera INSIDE or OUTSIDE your invisible sphere ? Does it work when it is inside and/or outside ?
thanks in advance,
Remi (France)
Thanks for the file, Ramy.
ReplyDeleteIn fact, I was wrong: Parti shader does not work with photometric light, but does work with the daylight. I have tried with your scene and an other one, and it works !
For the photometric lights, Jeff Patton has the same issue (cf his tutorial on Prati shader)...and this bug is not corrected in 3dsmax...too bad.
Remi (France)
Happy New Year!!!
ReplyDeleteThank you for this! I was looking for this for the past 2 years. Finally, this is working with exposure control!
Check out my latest posting on volumetric lighting for the file: http://3dsmaxrendering.blogspot.com/2009/12/parti-volume-file.html
ReplyDeleteto the other anonymous that was haveing trouble with light. try putting in a skylight as well. see if that helps.
ReplyDeleteThis seems like a great thing to use, but everytime I use it the volume ends up being super thick white lines that block out everything. I wish there was some intensity setting.
ReplyDeleteNice post. keep it up
ReplyDeletehow can i put two of those in the same scene ?... one for the lights and one for the ground ?
ReplyDeletefigured it out :)... anyway thanks for the tutorials
ReplyDeleteHi,
ReplyDeleteDo you know if this also works with unit setup in milimeters?
I can't seem to get it to work right.
Thanks in advance.
I believe these values are not based on the unit scale....someone correct me if I'm wrong though.
ReplyDeleteHi,
ReplyDeleteI tested the units with your 01-partiVolume_max2010.max file
with system unit 1 unit = 1 inch it works fine
1 unit = 1 milimeter it doesn't work
When i scale my scene 25,4 times smaller it works, but it's no option for me to work like that.
I quess this is just a typical 3ds max bug :(
Thanks for the tutorial anyway
Appreciation for the sharing.
ReplyDeleteHi Have download the max , im confuse how did you got sun2 (light)in Parti Volume Shader material where in file there is no sun2 such a light ,can you please explain how to get using daylight system plz
ReplyDeleteFor those who may be experiencing weird artifacts such as super white-intense parti volume, I've just found out that the Box anti-aliasing filter in 3ds max 2011 seems to be the cause. Switching to Gauss solved the problem.
ReplyDeleteHi everyone !!
ReplyDeletei'm fighting with some VolumeLight problems!!!
I lighted that scene with FG by 2 lights; than add to the spotlight, which is one of them, a volumelight effect from the modifier menu itself and the light cone becomes dark (unabled scanline for primary rays + segment shadows)
than tried with parti-volume and this time something works but all the scene becomes darken and exposure controls doesn't work any more!!
somebody can help me!?!??!!??! SOME IMAGES here
http://www.treddi.com/forum/topic/67747-volume-light-con-mental-ray/page__gopid__825544#entry825544
I needed to have "process background and environment maps" checked under "Environment and Effects" / "Exposure Control" to not get a fully blown out rendering.
ReplyDelete