Iridescence: Part I, the CD effect
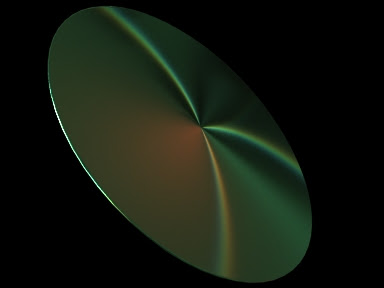
Iridescence. We all know what it is, and never knew what it was called. Technically it is the physical effect of a color changing based on its viewing angle. We see this in CD's, insects, bubbles, cars and so on. Here I'm going to explain how you can do this in 3DS Max.
Iridescence shader on torus knot
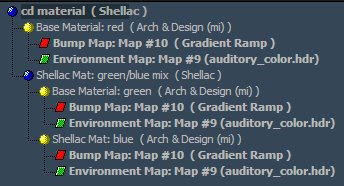
 When I started thinking about the shader, I began to think of how iridescence works in reality. This effect happens due to objects having multiple layers with different reflections. So the shader that would work best for this would be a multi-layered shader. The one I used here was Shellac for the controlled layering. Essentially I created 3 A&D materials that were highly reflective and layered them. Each with different reflection colors, red, green, and blue. The real trick to getting that iridescent color is by rotating the anisotropic reflection in each shader with a different rotation amount. Just enough to blend the rgb values gives a believable rainbow spectrum.

But just how do you get that cd reflection to scatter from the center out? This is where the gradient ramp comes in. Choose a radial spread to get the right results. It's placed in the bump map slot, and this is what scatters the reflection in a beliveable way. And as always you have to apply a UVW map onto your object so it knows where the radial gradient is starting from.
Happy texturing!
Iridescence shader on torus knot
 When I started thinking about the shader, I began to think of how iridescence works in reality. This effect happens due to objects having multiple layers with different reflections. So the shader that would work best for this would be a multi-layered shader. The one I used here was Shellac for the controlled layering. Essentially I created 3 A&D materials that were highly reflective and layered them. Each with different reflection colors, red, green, and blue. The real trick to getting that iridescent color is by rotating the anisotropic reflection in each shader with a different rotation amount. Just enough to blend the rgb values gives a believable rainbow spectrum.
But just how do you get that cd reflection to scatter from the center out? This is where the gradient ramp comes in. Choose a radial spread to get the right results. It's placed in the bump map slot, and this is what scatters the reflection in a beliveable way. And as always you have to apply a UVW map onto your object so it knows where the radial gradient is starting from.
Happy texturing!

that was great, thank you so much.
ReplyDeleteThat was useful, Cheer thank.
ReplyDelete2008-11-07
MENTAL RAY GLASS - It was blank page. What happen? or will there any chance update this?
I would like interest to see Mental Ray Glass topic.
Try the link for mr glass again:
ReplyDeletehttp://3dsmaxrendering.blogspot.com/2008/11/mental-ray-glass.html
Sorry it still wont working.
ReplyDeleteI have been click title link to new page but It still blank page and just title top of page that all. No tutorial display page.
i don't understand.. could u post the .mat for observation?
ReplyDeleteGreat tutorials ramy. I can't reach the nice color separation of your images in any way (my fault for sure). Could you explain a little more this material? Thanks in advance
ReplyDeleteI'm glad that i've find your blog, there are a lot of very advanced stuff. I hope that my post can help you to improve this rendering. Can you fix the glass post? Thanks
ReplyDeleteTry using blend material instead shellac, it doesn't brake the energy conservation law
http://mentalraytips.blogspot.com/2008_06_01_archive.html
hello, where r prior posts gone??
ReplyDeleteRocky,
ReplyDeleteon the right under Topics, there is a section called Previous Posts with a drop down to posts from each month
From the last months, previous posts link is not appearing anywhere in in your blog. I log in but the previous posts are not appearing. I load your blog both in Internet Explorer and google Chrome but previous posts are not appearing. Please tell me solution!
ReplyDeleteRocky, now I see what you are talking about. I will try to get this fixed. In the meantime, I know that firefox renders this blog correctly.
ReplyDeleteThanks for letting me know!
Hi, Ramy, your efforts took effect. Prior posts are shown again.
ReplyDeletehow can I down load this shader from u
ReplyDeleteit is available here:
ReplyDeletehttp://www.thegnomonworkshop.com/store/products/tutorials/rha_series/
Can bu use this on vray?
ReplyDeleteI don't recall if shellac is supported by vray or not. You can try it
ReplyDeleteawesome tutorial! I love the pictures in this tutorial because it's 3D. I love to see visuals on tutorials because I get to understand it better. Thanks for posting. I will also share this information to my friends. NIce blog!
ReplyDeleteCD duplication