
ChromaticAberration: BehindTheScenes
I have a lot of people ask me how I do chromatic aberration (CA) in post. Yes, this is a 3ds max blog, and you can do this in 3ds Max, but it’s much faster and easier to control in something like photoshop. So today, I’m going to show you the magic behind creating CA in post.
Firstly what is CA and why do we want it in our renderings? In an image CA is the red and blue color dispersion along the edges of an image. This is caused by the curve of a camera lens. Because a camera lens curves, at any point on the lens there is a different index of refraction, especially around the edges of the lens, hence the distortion of color in the image. Now because 3D artists focus on realism in their renderings, to achieve that extra step of realism, you can add CA into our renderings to make it appear as if the image was taken by a camera. You can do this, like I said, in 3ds max, or in photoshop as I will show you here:
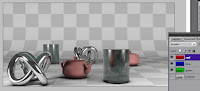
 Step 1, render your image and open it into photoshop. Here I created a simple scene for my example.
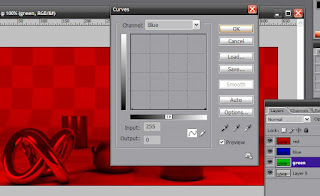
Step 2, copy the layer 3 more times. Now for each layer rename them accordingly: red, blue, green. For each layer open the Curves editor (Ctrl+M) and on each rgb change the output value to 0, except for the color that belongs to that layer. What I mean by this is that if you are working on the red layer, in the Curves editor only change the blue and green output to 0. Leave reds output at 255. You will do this for each layer that I renamed red, blue and green.
Typically because CA affects reds and blues more than greens, I put my green layer on the bottom. For the red and blue layers, change the mode of the layer to Screen. At this point now your image looks just as it did when you brought it into photoshop.
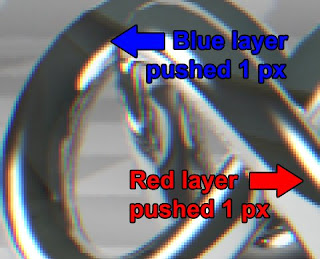
Here is where the real change comes into play. Because CA is a shift in color, we will literally nudge the blue and red layers. The green layer stays where it is, and in this example I nudged the red layer to the right 1px and the blue layer to the left 1px. As soon as you move these layers you will see the CA effect. If you want a stronger effect you can move the red and blue layers over more than 1px. If you move it over too much, the effect will begin to look fake, so be subtle about nudging.

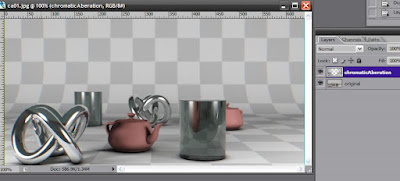
Once you’re happy with the way your CA looks, merge the red, blue, and green layers. Now because CA affects only the edges of an image, we don’t want this effect on everything, I kept my original rendering as a layer underneath the CA altered layer. I erased the central area of my CA altered layer with a large soft eraser, to allow the original image underneath to be revealed. Now the CA is only found near the edges of the image, the way it would be in a real photograph.
Now you know the secret to CA in post. Go and use this effect wisely my friends!
Firstly what is CA and why do we want it in our renderings? In an image CA is the red and blue color dispersion along the edges of an image. This is caused by the curve of a camera lens. Because a camera lens curves, at any point on the lens there is a different index of refraction, especially around the edges of the lens, hence the distortion of color in the image. Now because 3D artists focus on realism in their renderings, to achieve that extra step of realism, you can add CA into our renderings to make it appear as if the image was taken by a camera. You can do this, like I said, in 3ds max, or in photoshop as I will show you here:
 Step 1, render your image and open it into photoshop. Here I created a simple scene for my example.
Step 2, copy the layer 3 more times. Now for each layer rename them accordingly: red, blue, green. For each layer open the Curves editor (Ctrl+M) and on each rgb change the output value to 0, except for the color that belongs to that layer. What I mean by this is that if you are working on the red layer, in the Curves editor only change the blue and green output to 0. Leave reds output at 255. You will do this for each layer that I renamed red, blue and green.

Typically because CA affects reds and blues more than greens, I put my green layer on the bottom. For the red and blue layers, change the mode of the layer to Screen. At this point now your image looks just as it did when you brought it into photoshop.

Here is where the real change comes into play. Because CA is a shift in color, we will literally nudge the blue and red layers. The green layer stays where it is, and in this example I nudged the red layer to the right 1px and the blue layer to the left 1px. As soon as you move these layers you will see the CA effect. If you want a stronger effect you can move the red and blue layers over more than 1px. If you move it over too much, the effect will begin to look fake, so be subtle about nudging.

Once you’re happy with the way your CA looks, merge the red, blue, and green layers. Now because CA affects only the edges of an image, we don’t want this effect on everything, I kept my original rendering as a layer underneath the CA altered layer. I erased the central area of my CA altered layer with a large soft eraser, to allow the original image underneath to be revealed. Now the CA is only found near the edges of the image, the way it would be in a real photograph.

Now you know the secret to CA in post. Go and use this effect wisely my friends!
you could easily obtain the effect of decreased CA in the center by applying a layer mask to the merged RGB layer as well!
ReplyDeleteGreat tutorial.
ReplyDeleteflavio
Can't you just go filter > distort > lens distortion and apply some CA in there???
ReplyDeleteYes you can. You can also use plug-ins like PT-Lens. I just wanted to explain what is going on behind the scenes when you create CA, how it actually works.
ReplyDeleteThank you, so simple... it's shame I didn't get earlier. Now instead of moving layers left and rigt, I scale them up and down (0,2 to 0,4%) in after effect, It works pretty nicely :)
ReplyDeleteyes, it's most useful for applying in after effects to animations.
ReplyDelete